
How I Made Tombstones
- Oct 6, 2022
- 3 min read
Updated: Oct 23, 2022
After deciding on the theme of a cemetery this year, I. knew I would have to build some tombstones. Having built three before (Jason, Freddy, Michael) I knew I would have to improve the build quality to withstand heavy winds and handling. Styrofoam by itself wouldn't cut it.
First, I designed a concept for each tombstone and bought a lot of foam from Home Depot. The giant 4' x 8' slabs didn't fit in my car, so there I was in the parking lot cutting foam. I already knew that I could get 4 tombstones out of each sheet, so knew exactly how to cut it apart.
Once I had a general tombstone shape cut out (two identical pieces that would be sandwiched together), I had to make it the tombstone stand. I carved two channels in the foam and added PVC tubing through most of the vertical length. I hot glued the pvc but didn't think it was enough since hot glue can fail. I added some tape for insurance. Plain old masking tape sticks very well.


A second sheet of foam also got the corresponding channels and laid on top of this creating a thicker, studier tombstone. Both pieces of foam were glued together. Using two metal floor flanges and PVC connectors, the PVC pipe was glued onto the stand. This creates a very sturdy base. I then filled in the exposed area with more foam.


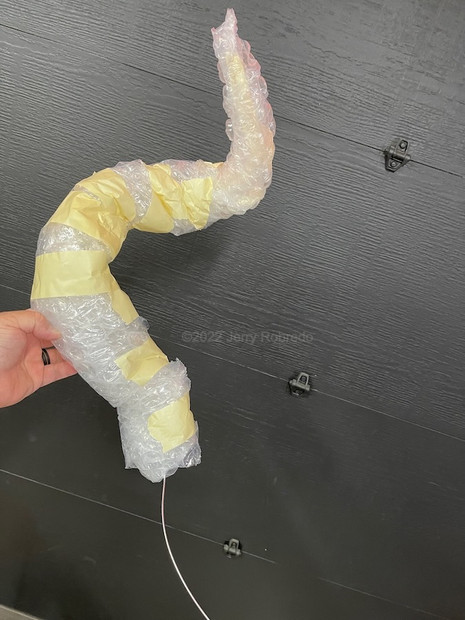
I then created the specific decor for each tombstone. For the Lovecraft tombstone, I wanted tentacles. I used heavy gauge wire as the core then wrapped it in bubble wrap, using masking tape to secure and shape. Then bent the wire into desired shapes, using the tombstone for guidance. I would eventually use plaster wrap to cover each tentacle to give it strength but remain light. Once hardened, it won't give like paper maché.


There are many types of foam. For the base layer, I used plain, white insulation polystyrene. For more intricate carving, I use the denser blue or pink foam. This holds details much better and is easier to carve. Of course, it's way more expensive so I limit the use.
Since I don't have much freehand illustration dexterity, the epitaph is challenging. I printed out a design on plain paper then taped it to the foam. Using a wood cutting tool with the blade attachment, I cut through the paper and carved the foam underneath. Once the outline was complete, I removed the leftover paper and using a foam cutting tool cut out the rest of the letters. It's a slow process.

Finally, I glue the embellishments on the tombstone, in this case tentacles, using the wire on the ends of each tentacle to secure in place. I use bamboo dowels to help keep the tentacles upright. I also added other embellishments at this stage using paper clay, and a few cracks using a wood burning tool and a shaky hand.

Then comes the paint, lots of it. The base coat of spray paint forms a good seal around everything. Layers of other paints add texture, highlights and shadows. The aging process involves a spray bottle of water and spray paint. Painting is a whole other process to discuss in another post.
Here's the completed tombstone which also gets a finishing spray of water-based spar urethane (oil-based always seems to stay sticky). I drilled two holes in the wood base and secured to the ground with stakes. This tombstone isn't going anywhere.
Here are the tombstones I created this year, in honor of the authors who influenced my horror journey. (Stephen King would be in here, but he's still alive and I didn't want to prematurely bury him.)


Comments