
How To Make a Gothic Fence
- Señor Scary
- Sep 7, 2023
- 4 min read

A yard haunt needs a creepy gothic fence whether you need to surround a cemetery or just want to add a spooky touch. The plastic ones from the Halloween store are flimsy, expensive, very small and just don’t last long. Gratefully, Stolloween.com is here to the rescue with a fantastic tutorial on making a fence from wood and PVC pipe. Here is my adaptation, directions, and sources.

The following supplies will make TWO fence sections, each about 4 feet wide and 3.5 feet tall. Add as many sections as you need. Smaller sections follow curves better, but if you just need straight fences, don't cut the wood boards in half.
4 PVC pipes (schedule 40, 1/2”, 10-feet each)
3 wood boards (1x2, 8-feet each)
32 screws (1 1/2” black drywall)
12 plastic finials (fits over 3/4”) KingMetals.com
3 sheets EVA black foam (9”x12”, 6mm thick), Amazon.com
black hot glue sticks, Amazon.com
black wire
black spray paint
gray spray paint
STEP 1: Cut the PVC Pipes
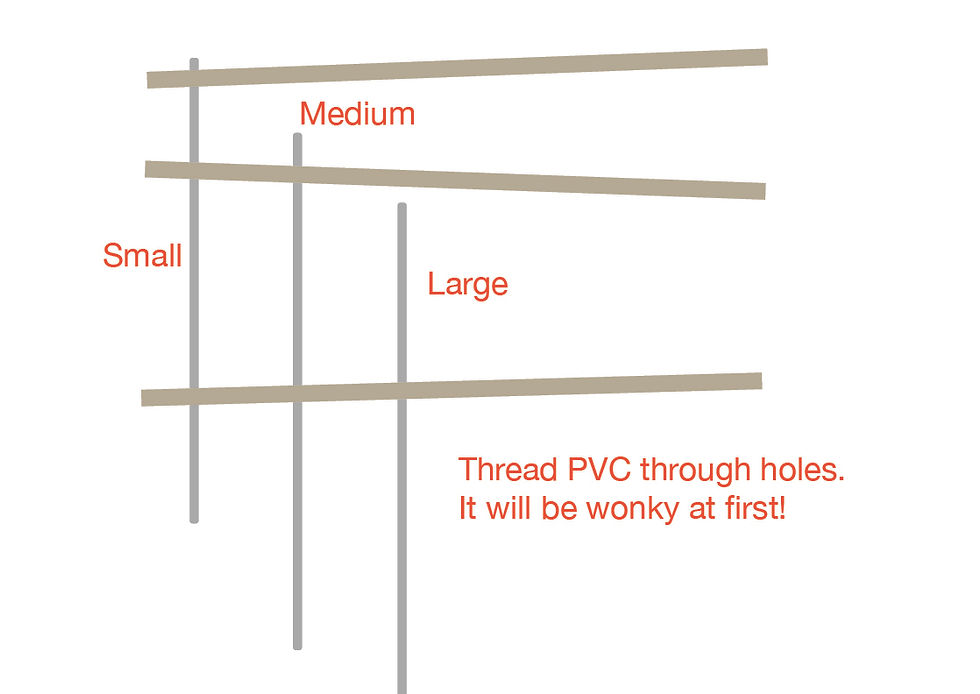
Measure, mark and cut each 10 foot PVC pipe (with pipe cutter or hand saw) into 3 sections measuring 36 inches (small), 40 inches (medium), and 44 inches (large).

STEP 2: Cut the Wood Boards
Measure, mark and cut 1x2 wood boards in half with hand saw. (Tip: Wood can vary in length up to 1/4-inch depending on how it was milled/cut.)

STEP 3: Drill Holes in the Wood Boards
Each board will get 6 holes using a 7/8" drill bit. The holes will be 8 inches apart, and the first and last hole will be 4 inches from each edge. (TIP: Use the first board as a template for the rest.) You will also make two small holes on either end with an 1/4" drill bit. These holes will be used to wire fence sections together.

STEP 4: Paint a Base Coat
At this point, I found it easier to spray a base coat (flat black) on the wood and the PVC before continuing with the build. (Tip 1: PVC can get handled a lot and sometimes gets grimy/coated. Wet a rag with vinegar, wipe them down and let the dry before painting. Tip 2: Depending on the the paint you use the lettering imprinted on the PVC may show through. Use sand paper to remove the lettering. Tip 3: Sanding also helps ensure the paint will stick on better but make sure to not leave dust behind by wiping with vinegar rag again.

STEP 5: Initial Assembly
Set three boards on a table or ground. Guide the small PVC pipe through the first hole on all three boards spaced with two boards on top and one on the bottom. It will be wonky but we will fix it in the next step. Continue with the medium, the large PVC pipes. If the holes aren't perfectly aligned that's okay. The PVC will give a little.
STEP 6: Spacing and Screwing Together
From the bottom of the PVC measure 5", space the wood evenly across all six pipes so the wood lays evenly. Drill a pilot hole smaller than your screw (measurements vary) through the wood and just into the pipe. Do not go through. Screw in your drywall screw to secure the PVC to the wood. Continue with the other pipes in the same manner, but skip the second and fifth pipe (this is where you will later insert a metal rod to secure to the ground). (TIP: The PVC pipes should be even along the bottom otherwise the fence will not sit evenly on the ground.) Measure 20 inches then position the second piece of wood evenly across all six PVC pipes. Measure 4.5 inches and position the top most piece of wood.

STEP 7: Add a Finial
Stolloween makes finials with foam sheets but I found they just don't last and rip easily. I used plastic finials from King Metals (make sure to get the ones that fit over 3/4" bar). The PVC pipe is just slightly larger than the finial and I found it easiest to heat the end with a heat gun, softening the plastic just enough to shove the finial on. Once it cools it "locks" the finial in place but may need a little glue to stay permanently. (Warning: Heating any plastic gives off toxic fumes. Wear proper protection and work outdoors.)

STEP 8: Add Decorative Swoops
Using a sharp box cutter, slice a 9”x12” EVA foam sheets into 9 strips lengthwise, 1-inch wide. You’ll need 12 strips per 4-foot section. Using hot glue gun on high-temp setting (for better bonding than low-temp), bend and glue a strip as shown, centering evenly with pipe. Glue both sides and top. Using the heat gun on a low setting, evenly and lightly heat EVA foam on all sides until it turns shiny (usually only a few seconds). This “seals” the EVA foam.

STEP 9: Painting a Aged Finish
Once assembled, touch up the paint as needed. You can leave like this or add some texture using a variety of methods. VanOakProps.com suggests coating with spray adhesive which gives a mottled look of old iron. You can also age the fence by spraying gray paint in blotches or dry brushing. You can also add rust effects with dark red-brown paint. There's many tutorials for aging props and I recommend starting with VanOakProps.com for some fantastic finishing ideas.
STEP 10: Setting Up the Fence
To set up fence, hammer 3-4 foot pieces of metal rebar into the ground that align with the second and fifth PVC pipes (that didn't get a screw on the bottom wood rail). The length of rebar depends on your soil (loose requires deeper insert vs. dense clay that requires very little depth to be sturdy) but the rebar should come up at least 2 feet inside the PVC pipe.
To join sections of fence together, thread black wire or zip ties through the end holes on the wood rails. I also recommend wiring the fence to nearby trees or sturdy landscape elements to add more stability.

Comments