
PROP BUILDING
Decor from the Halloween store is great but seasoned home haunters know that making your own props is better, cheaper, and creatively liberating. With a few techniques like large scale paper mache, foam carving, repurposing everyday materials from the home improvement store, you can bring your nightmares to life. While this step-by-step process is how I made a giant spider, the techniques can be applied to any prop. I used five common building materials: foam pool noodles, PVC pipe, chicken wire, paper mache and monster clay.
Making A Giant Spider Named Winnifred

1. Because of the large size, I used light materials which included pool noodles with notches cut out for the bendy legs. Joints were reinforced with inexpensive masking tape.

2. I laid out the legs to get a sense of the shape. PVC pipes fit snugly into the center hole of the pool noodle. PVC pipe is solid and durable for an underlying structure.

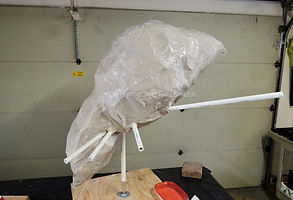
3. Next I formed a general drum shape for the the body by laying chicken wire over a large water bottle. (Gloves and protective eyewear are a must – safety first!)


4. I snipped and bent the wire together to hold a shape. Then I threaded the PVC pipe through the chicken wire in crisscross pattern.
5. I glued and taped the center point of the PVC then filled the shape loosely with balled paper to help support the chicken wire shape.
6. To further define the shape, I covered it in foil and tape, shaping various elements and leg tips, using tape to hold it all together.

7. I then covered the shape with strips of newsprint paper dipped in diluted Elmers glue (see below), repeating the process several times to buildup the layers.
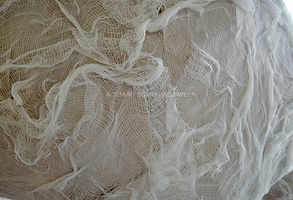
8. I dipped strips of cheesecloth in the same glue mixture and added it on top for a woolly texture.
9. Using Monster Clay (see below) I sculpted a face using icky reference pictures from the web. I used round foam spheres cut in half for the eyes.
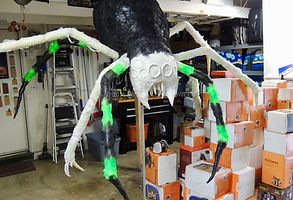
10. I painted the body and face with black spray paint and brushed several coats of spar urethane to protect it from the rain. This coating is critical!

11. I dry brushed details on the face, added glossy neon paint to the eyes, and dripped hot glue slime from the mouth.

12. The completed spider fit over a metal pipe affixed to a large weighted platform to keep it upright in the wind. A little webbing easily hid the pipe.

Paper Mache (for base)
1 part Elmers Glue-All
2 parts water
newspaper or packing paper
large airtight container
Add water to glue and mix until well combined. Store in an airtight container.
Use newspaper print torn into strips of various sizes and widths. It best to tear and not cut the paper with scissors since you want the rough edges to "melt" into one other.
Dip each strip into the glue mixture and squeeze between two fingers to remove excess glue. Apply in crisscross pattern for strength and smooth out as you go. Apply 4-6 layers, then allow to dry completely. Add more layers for greater strength. Dry completely at least one week in a hot garage before adding details or painting.

Monster Clay (for details)
1 part joint compound
2 parts Elmers Glue-All
5 parts CelluClay
water, if needed
large airtight container
spray bottle with water
bowl with water
Mix joint compound and Elmers glue until well combined. Add CelluClay a little at a time (use a respirator mask) until well incorporated adding a little water if needed. Cover tightly and let stand 15 minutes.
Dip hands in bowl with water and scoop out some of the clay. Seal the lid on the container so the unused clay doesn't dry out on top. Spread thinly and sculpt the clay as desired, working with wet hands. Spray clay with water to smooth out. Take your time and have fun! Allow to dry thoroughly before painting about 1-2 weeks in a hot garage.

